Mounting a bobcat can be broken down into three different categories, skin preparation, mannikin preparation, and the mounting process (in that order). Join me in a step by step process of mounting a bobcat. Lonny Travis
BOBCAT SKIN PREPARATION
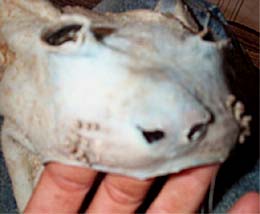
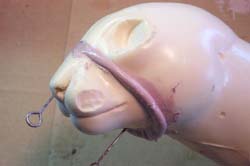
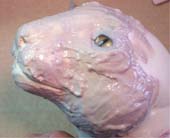
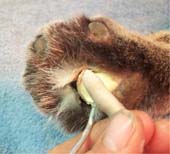
After the hide has been tanned, and tumbled in sawdust, I begin thinning the lips, eyes, and nose. I start with the lips, and begin shaving them with a scalpel blade from the lip line out to the edge of the excess skin. The actual lip line in the picture is just below the whisker butts, and the remaining skin is the amount of the excess skin which will be tucked into the mannikin to hold the lip in place(approximately 1/4 inch). It is important to get these areas as thin as possible in order to prevent excessive shrinkage, which would cause the lip to pull out of it`s tucked position.
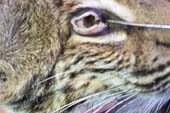
Now we move to the eye lids, where we need to thin around the eye, and trim the excess skin for tucking. You can see the color variation in the picture of where I have thinned, as opposed to where I haven`t.
On the top and backside of the eye, I thin approximately a 1 inch area just to help prevent shrinkage around the eye. A person should also thin the actual skin we are going to tuck between the eye and the epoxy/clay. As you can see in the picture, I leave about 1/16th to 1/8th inch of this skin for tucking.
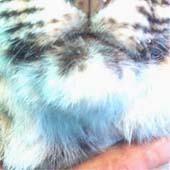
You should also trim the flesh from around each individual whisker butt at this time.
If you want good looking whiskers, then take the time to thin these areas.
The nose of a bobcat is fairly simple to thin. Remove all the cartilage and leave only the nose pad. Be sure to make this area as thin as possible to prevent shrinkage.
Now clean the remaining sawdust off the earbutts, and invert them into their natural position. At this point I sew up any holes or damage that the pelt has.
Then I make a cut at the forward end of each foot pad so the leg rods on the mannikin will slide through the paw, allowing the leg to slip into position. A tip of the trade here---use your "ear openers" inside each leg to stretch the skin prior to mounting.
My last preparation to the skin is to Bondo the ears into a nice natural shape. You can use commercial earliners if you desire, but you`ll have alot more flexibility by doing them yourself. I simply reach in through the bobcats mouth and spread the ears open, mix my Bondo, then put the Bondo in the ear. As the Bondo hardens I shape the ear to the position of my choice. Always have good reference material on hand.
BOBCAT MANNIKIN PREPARATION
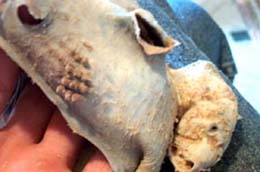
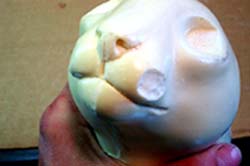
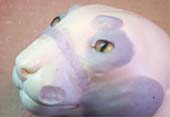
Mannikin preparation is probably one of the most crucial steps in taxidermy. I always start with the bobcat`s head, as you can see in the picture.
Purchase yourself a bobcat reproduction nose and use it for reference.
I use a dremel tool inside the nostrils, and then I take a razor blade and cut underneath the outside corners of the nose. You need enough space in this area to slide the skin under the nose.
I also used the Dremel tool to oval out an area for the whisker butts, so that the fur will lie correctly in this area.
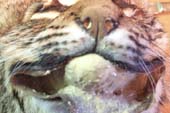
Now, find the center of your nose, and cut right down the center of it, about 1/8 of an inch deep, all the way down to the lower lip. Take your razor blade and "V" out an area, starting with the most shallow part of the "V" halfway up the nose. Continue making the "V" deeper as you get to the upper lip. You`ll need this space later in order for the crease of the nose and lips to look correct.
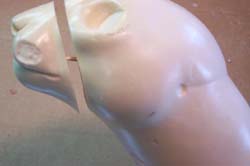
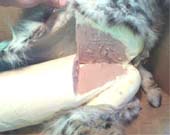
We need to make a 1/2 inch deep cut along the lip line so we can tuck the lips later. I use a thin knife to accomplish this until I get to the corners of the mouth, then I use a thicker knife to accomodate the gathering of the lips in the corners of the mouth.
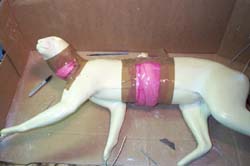
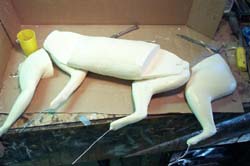
At this point I had to increase the length of the head and the body.
The eye to nose measurement on the mannikin was 1 3/4 inches, and I need a 2 inch eye to nose.
I simply cut the form and used toothpicks to get my gap correct before I applied the Bondo.
The customer wanted a sharper turn to the left, so I made that adjustment also. I then cut the body in half, and used 3 pieces of 9 gauge wire to hold the two pieces in place as I poured the foam. The pinkish color you see is nothing but plastic wrap which was taped onto the mannikin to contain the foam as it set. Learning to make small changes like this will really add to your taxidermy accomplishments.
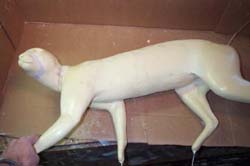
After making all the alterations, I use a vixon file to smooth the mannikin where I made the changes.
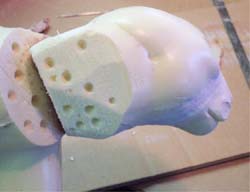
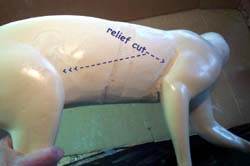
I then use a keyhole saw to make relief cuts under the legs, chest, and inner groin area so the skin will go up under the leg as it would naturally. Neither of his left legs require a relief cut, but both legs on the right side have been slotted so the leg skin will slide up between the leg and the chest.
At this point I rough the mannikin with a file and a wire brush. I do not rough the legs of the mannikin on my bobcat mounts from the knee and elbow down. The skin will not "drum" in these areas anyhow, and it will make sliding the skin on alot easier because of the slick surface.
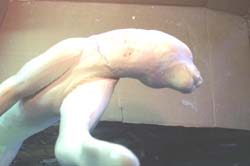
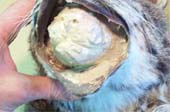
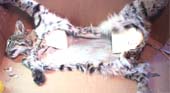
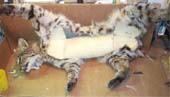
Since I`m using the ventral incision without any cuts down the legs, I had to remove the head, and two of the legs, off the same side of the mannikin in order for it to be possible to place the skin on the form (reference photo).
THE BOBCAT MOUNTING PROCESS
As you can see, a lot of work goes into the preparation before we can even get started on the mounting process. I remember when I first started taxidermy, I always got in a hurry, and skipped a lot of the skin and mannikin preparation, but as time went on, I found out how much easier it was to get things right the first time. Not to mention my quality improved.
At this point, I prefit the skin on the mannikin to make sure everything will fit properly. I added some epoxie to the cheek areas, and took off about an inch of girth around the midsection of the mannikin with my file.
Now it`s time to set the eyes and do the epoxie work around the eyes. The pupils on a bobcat should angle in at the top of the pupil at a 10 degree angle. You can buy eye graphs from most taxidermy suppliers which will help you set the eyes accurately. I don`t get real detailed on my epoxy work around the eyes as I would a deer. Basically, I put small rolls of epoxie around the eyes and smooth them out nice and even. I also add a small dab of epoxie for the eyebrow areas.
I do not use clay on my bobcat mounts because the epoxie will hold the eyes in position, whereas clay is not an adhesive, and will not adhere to the skin. The only drawback to this method is that you only have about 4 hours to complete the eyes before the epoxie hardens. In the last 150 bobcat mounts I`ve done, I haven`t had any eyelids pull away from the eye. After the mount dries, I simply paint the eyelids and drive on. No pinning is required either. Basically what I`m saying is, use epoxie for your eye work, not clay.
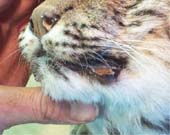
Apply a generous amount of hide paste on the facial areas as shown in the pictures. Be sure to cover the epoxie with the hide paste. This will help the skin slide over the epoxie without disrupting it. Before you slide the head inside the skin put a roll of epoxie around both ear butts so you can permenantly attach the ears to the mannikin.
Start with tucking the upper lip first. Locate the "V" you made in the mannikin earlier and press the nose skin down into the slot. Now tuck the lip directly under the nose. As you start working towards the whisker area, work the skin towards the nose as you tuck (tuck in and push forwward at the same time). Stop tucking the lip once you get to the whiskers. Once you get both sides of the front lip tucked move back to the corner of the mouth and tuck the very corner. As you work towards the front of the lip, you must tuck the skin, and force it to the back corner of the mouth as you go. This will help take up the slack skin in the mouth and make the lipline look natural.
After the upper lip is in place, I move to the lower lip and tuck it into place (leaving a visible lower lip). Then I move to the back corner of the mouth and complete the lower lip.
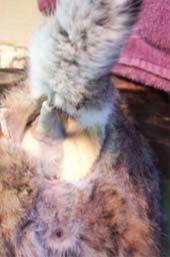
Now it`s time to tuck the eyes, but first I taxi the skin into position. I personally use an uphosltery pin for my eye tucking. Start in the front corner of the eye, and slowly work your way to the lower rear corner. Keep the eye clean of hide paste by using a Q-tip. The back corner of a bobcat`s eye is located about 2/3`s of the way up on the pupil. As I tuck the upper lid, I go back to the front of the eye and start there. Make sure you're tucking the skin under the epoxie during this process.
At this point I`m just getting the eyelids tucked into position. I won`t do the final setting until the head is reattached back on the mannikin. The reason is because I`m likely to get fairly rough with the skin while I`m attaching the head, and locating the ears, and there is no sense in spending a lot of time getting them perfect at this point. The only reason I tuck them now is because of the 4 hour work time of the epoxie. After 4 hours you`ll still be able to move the eyelids around in their final position, but the epoxie will not be as workable.
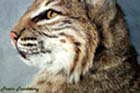
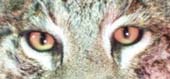
Pay close attention to the surrounding markings on the bobcat's eyes. The white patches, and front corners of the eyes should be fairly symetrical by now. The nose will be completed after the mount is about complete.
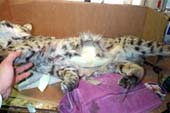
I`m now ready to insert the two legs I removed from the manikin. I cover them in hide past, and slide them all the way in to the toes. Next comes the rest of the mannikin as shown in the pictures. Then I use bondo and reattach the legs followed by a 4 inch screw to help strengthen the mount. The head is attached using the same process. At this point, lift the hide and apply a good coat of hide paste on the bobcat's back, and halfway down his belly. Now, simply start sewing, and adding the final hide paste down closer to the incision as you go.
I didn`t show you earlier, but I took the keyhole saw and cut out a notch between the hind legs where the sex organs and anus are located. As you can see in the pictures, I filled this area with epoxie once I get the incision sewn to this location. Fill his scrotum with small rolls of epoxie and contiue sewing. Wrap the tail wire with epoxie and complete your stitching. Now push the anus inward into the epoxie and shape it in a natural position.
The customer wants this bobcat to sit on an 8 inch shelf, so I cut the base out of plywood and built the stilts out of 1x4 material. Now my attention goes to the feet and toes. Open the front of the footpad and insert 4 small rolls of epoxie into each toe location. Then put a larger roll just on the upper side of the mannikin`s foot. Pull the toes back onto the mannikin and shape the toes and toe junction. Now place the cat on the base and make the feet rest on the base in the correct position.
Now, back to the head for the final touches on the eyes, ears and nose. Use good reference material at this point, and take your time making them exactly the way you want them. Once you have the ears in their location, push down inside the ear and set the epoxie hard against the mannikin. Now go to the nose, and locate it by tucking the corners of the nose first, then shaping the lower nose areas. You should have excess hide past squeezing into the nostril area. If not, be sure and place hide paste under the nose pad. Remove any excess squeeze out with a Q-tip.
Now go over the entire mount and taxi the skin into it`s final position. Pay close attention to distinct markings on the bobcat as you go. This particular cat has 3 black lines running down the center of his back, which must be centered. The mount is completed less setting the whiskers, which I always do after he has dried for 24 hours. Just simply start with the front whiskers and work aft. Grab the whiskers and pull them forward into their final position. I personally let the mount dry 3 to 5 days before I do the finish work (detail painting) depending on how fast he dries. I do push in a few hide nails in the groin and chest area to prevent drumming of the skin.
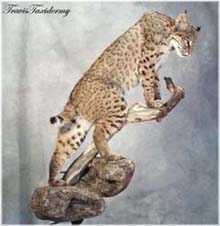
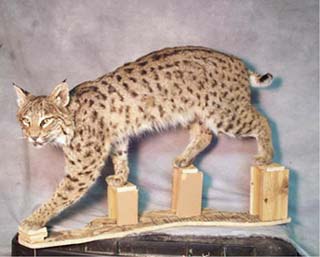
BOBCAT TAXIDERMY MOUNT
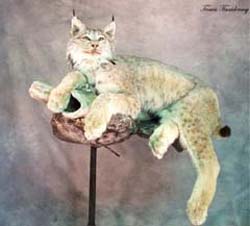
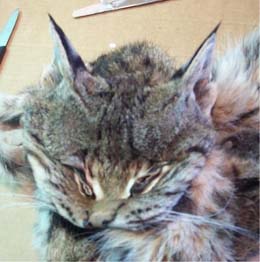
LYNX TAXIDERMY MOUNT
HIDE TANNING AND TAXIDERMY
WHITETAIL DESIGNER SYSTEMS, INC.
Has made another expansion! Web site services for taxidermists are now available!