Brad Eppley has set the industry standard for inexpensive whitetail deer ear liners for the past number of years. Live deer ears come in sizes, so they will frequently need to be trimmed to fit. They also come in shapes, which that can be altered to a degree also, which will be demonstrated here.
I chose Brad's latest addition to his line of ear liners for this mount. It is the one being sold as a commercial liner. It is a white polystyrene and that allows a few tricks to be done with it. I also like the thinness, and proportions are close enough to most of the deer around here that I don't think most people would ever notice the minor difference.
Two things I like about this liner are, Apoxie-Sculpt sticks to it, and it can be shaped easily with hot water.
To shape with hot water, I put a gallon of water in a six quart Dutch Oven, and heat it to about 160 degrees F. That is usually about the point where you see the little bubbles forming on the bottom of the pan. Then I turn the heat off.
I then slowly stir the water with the liner in the same fashion as I would do with a ladle. I keep checking the liner for softness. If the plastic sticks to fingers, it is too hot. When it is warm enough, I start shaping. If I am making a major bend, I will not try to do it all at once, that could cause distortion. I will do about half of the bend, allow the liner to cool enough in that position to where it is holding shape, and then reheat, and finish the shape. It doesn't take long at all to do this, and it is that simple.
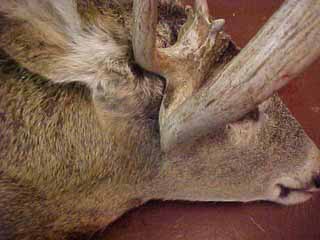
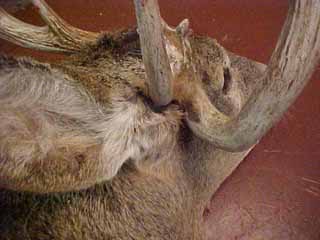
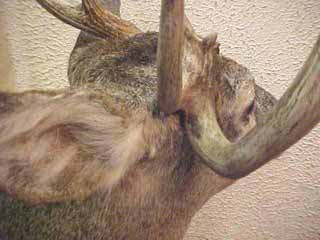
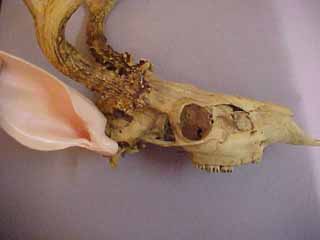
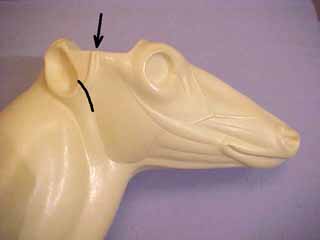
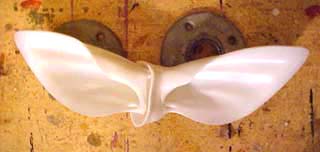
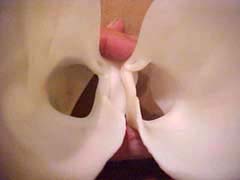
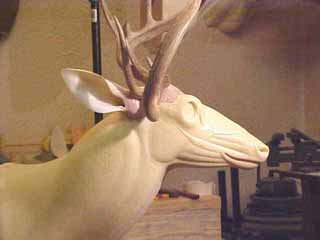
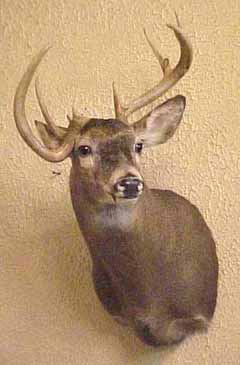
Even though I did the photography for the entire whitetail line of the WHITETAIL DESIGNER SYSTEMS reference disks, these first two photos were my primary reference photos to work off of, the third photo is a fairly close angle shot of the finished ear. I had taken several photos of the head, before and after skinning. Ya gotta love this digital imagining for reference work, it is one handy tool.
As you can see in the photos, the main beam had grown down, and was putting pressure on the side of this buck's head. He had to be continuosly sore while in velvet. In order to get the cape free of the head, I had to use a #15 scalpel blade and cut in close to the skull. There was a "dent" in the muscles under the main beam, and it was pretty well hairless where the pressure was exerted.
Darndest thing, in this same ear was a fresh hole about .22 of an inch in diameter. A friend of mine took a nice buck just very few miles to the north east of where this one was taken. It too had one of those holes clear through an ear. How do you suppose those got there? Must have been caused by insects, or some other lower life form.
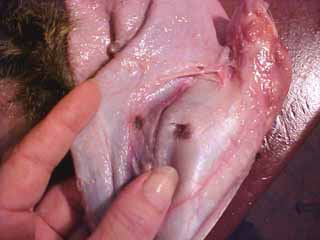
The cape had been in the freezer for over a year. The reason this looks like a fresh turned ear is because it had been treated with STOP-ROT before freezing, and the STOP-ROT was used after thawing as an aid in softening the skin to cartilage bond to make for easier opening and turning. The deer had been taken during gun season with a 12 gauge, which was a neck shot. The STOP-ROT was also used to help float up the congealed blood from around the entry wound.
If you are a deer hunter reading this, here's a few things you need to know.
This cape was cut short. It was also cut up the brisket, with a piece missing. When you see the photo of the finished mount, you will probably be thinking, "It looks fine to me," BUT a lot of that was luck on my part. This buck would have had a brisket hair pattern that would have ended in a cow lick about two inches above the sternum. That length of hair pattern is what allowed the finished mount to look like it falls in the ranges of normal. I would much rather have had all that skin to work with, and the "arm pits", and brisket would have looked better.
Many taxidermists will charge an extra $25-$50 for the sewing repairs for briskets that have been cut up too high, and in some cases, that may not be enough to cover the extra time loss.
It's not just a thing of a little extra sewing, it's also a thing of being a little harder to flesh initially, and shave thinner afterwards. It's also a thing of having to frequently trim more skin off in order to get edges to come back together because of jagged cuts. It's sewing leather by hand, with six to eight stitches per inch, which may still not be close enough together to keep some of the hide pastes from oozing, and seeping from between the stitches. That is the lowest point on the mount, and liquids tend to run there. When adhesives leak through, that can make one melluva hess to clean up. It's even worse if the leakage isn't caught in time.
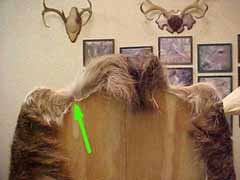
In the below photo, you can see how close I was on this one. The skin you see on the back board was not trimmed, I barely had enough to catch a staple. Where the arrow is pointing, that was just enough skin to fold over.
Moral of the story, be sure you, or who ever skins the deer out for you knows what they are doing. Excess can always be trimmed off.
If you are a person new to taxidermy, and are having trouble with ear placement, you will need to build your own personal reference collection. Not only will you need taxidermy reference photos, but you will also need to build a note book around your own observations, and measurements. An overlooked source of information is skulls, and actually neck vertebrae, scapulas, and humerus, for whitetail deer shoulder mounts. The price is right on these items. You can gather as you go. Skinned out heads should not be overlooked as a reference source either. You can photograph them from different angles, and then also freeze them for use as a dimensional reference source. These references will be real handy if you need to get into any head alterations. You will also want to keep skulls from the different age groups you are likely to encounter, such as yearlings, 2 1/2 s, 3 1/2 s, etc.
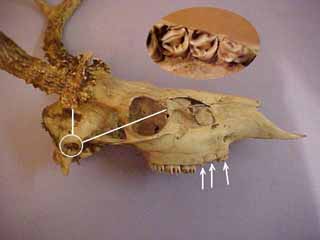
The skull photos below illustrate the effectiveness of skulls as taxidermy reference material.
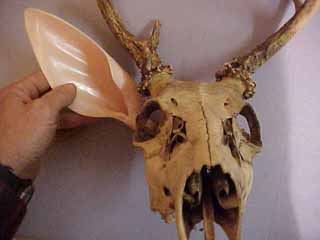
The auditory canal is at the end of the zygonator arch. I have identified it with a circle, it is really obvious when the skull or head is in hand. Recording measurements from antler burr to ear canal, and front eye corner to canal, will help to zero in on placement of a buttless ear liner. I'm holding an ear liner in place so you can get a visual on both a "cranked" back ear, and a forward ear.
The inset shows a bottom view of the three pre-molars that the arrows are pointing to. Numbers two, and three have erupted through the gums, and pushed the caps off, this would identify this buck as right about eighteen months of age, or a late yearling.
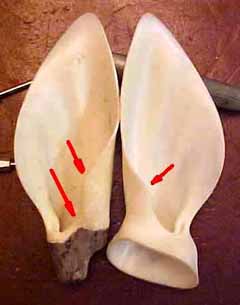
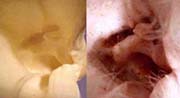
In the first photo, you can see that the ear canal of the ear liner doesn't curve, or flow, into the skull when the ear is cranked all the way back. The flow of the section of the earliner where the scuto auricularis inserts, the muscle that has the little piece of cartilage in it, is also interrupted.
That muscle originates behind, and below the antler burr. These are the areas that I am going to change with this alteration.
I have pointed out that this is a yearling buck, and as a yearling, his skull's proportionate width will not be the same as a mature buck. If you are showing too much ear butt between the back of the eye, and the V in the ear, the head of the mannikin might be too proportionately wide for the deer you are mounting. Use calipers, and straddle the back skull, and get an "ear hole to ear hole" measurement. To get the right "look", you might have to carve this area down.
Another thing you want to be aware of, if a mannikin has pre-sculpted ear butt locations, they are going to be most generally made to fit up with a forward ear. When that ear cranks back, the muscles on the head, around the butt move. If you try to form your ear butt without changing this area, you'll will all probability wind up with too big a butt that is going to be incorrect. This is a simple enough fix. Just carve off the foam to blend, and flow in to the butt muscles as identified in the photo below.
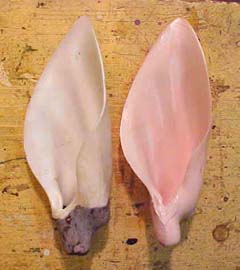
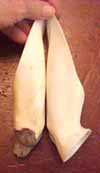
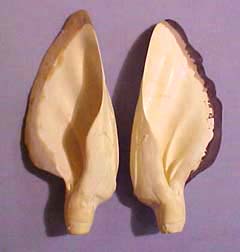
This mount gets the right ear done in the pinned back position, and the left ear forward. So I just whack the ear butt off the right ear liner.
With the butt cut off, the ear is really easy to shape with hot water. You can see the difference in the shape of the ear canals here.
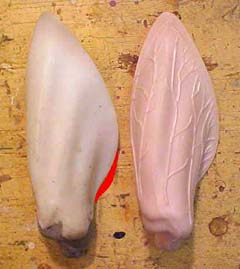
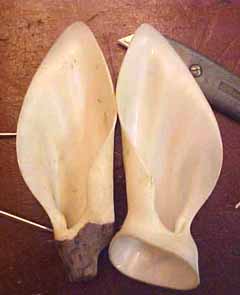
To build the ear cartilage shape, I used the techniques like I have described in POP ART EARS on the WHITETAIL DESIGNER SYSTEMS site. The orange "lobe" I have added in the first photo shows a shape that is real common in deer around here. It is always super thin cartilage, and I really haven't figured any way to add that "extra" to a plastic liner. The second photo shows how much I have rolled the ear in, and what that can do for an overall look.
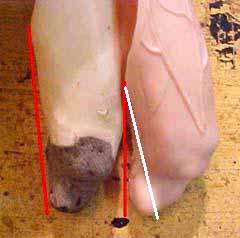
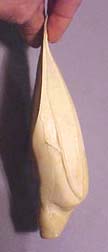
The ear cartilage of a live deer is quite flexible, and changes position as the ear goes forward or backward. This photo shows how much I have changed the angle with this alteration.
The first photo shows the amount of change accomplished by rolling the ear liner. The forward ear was changed by heating in water to make the match.
The altered ear is shown here. The ear butt muscles were sculpted with body filler and Apoxy-Sculpt. The attachment techniques are described in EAR BUTT ATTACHMENT.
The forms pictured are from Hilton Eppley's new line. The ear liner alteration is shown in place on the finished mount below.
We can't leave ear liner alterations without throwing in another alteration to an all together different ear liner. For you southern folks, the ear liners that fit up to the deer in our neck of the woods is too large for you, and Rick Carter of WASCO in Monroe, Georgia has came up with the answer for that situation. He created a competition ear liner that is available exclusively through WASCO. So why alter his ear liner? To fit midwestern deer!
Comparing measurements of the auricular cartilage surrounding the auditory canal of our midwestern deer with corresponding points on Rick's earliner, I only found about 1/8 of an inch discrepancies in diameters!
The big differences were in the overall size of the ear. Easy fix. When ever I mix up Apoxie-Sculpt, I always mix more than I need. If you do the same, you can build up around the ear edges with your excess, instead of just sitting down and doing it deliberately. You can then use the removed cartilage for your pattern to cut the ear to shape and size. You can use a coping saw to cut with, or grind off the edges. Scraping with a utility knife blade will thin down the edges. You might have to grind, along with sanding, to smooth out your transition into the ear liner on the back side.
You will notice in the photos that this ear liner comes with the attributes that I just got through putting into the alteration.
Another feature of this ear liner is the inner ear detail. I took the inner ear detail photo that is on the WHITETAIL DESIGNER SYSTEMS Master's Series Ear Muscle Studies disk and cropped it down, and took a photo of the ear liner detail, and set them up for a side by side comparison.