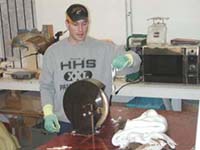
Dan is out to save you the headaches of learning about fleshing machines.
We’ve all heard that worn out phrase, time is money and saving time in the shop will make you more money. How can you save time in you shop, you're thinking, I could get a fleshing machine, but thoughts of holes in capes, and sewing up those holes, race in your head. You think that isn’t saving me any time. Then the nightmare gets worse, what if I cut off a finger and won’t ever be able to do taxidermy again? Put those nightmares at ease and read about the simplicity and ease of these machines. Start saving time and making money.
A fleshing machine can, and will save you time and money, but with all things you need to do a little research and study even before you purchase a fleshing machine. Once a fleshing machine is purchased, then you will need to put in more time, study, and practice, to have a smooth running fleshing machine that enables you to increase your profits.
This brings me to the first step of owning a fleshing machine, the research and study before you buy a fleshing machine. I would call the manufacturers of the fleshing machines that you are looking at buying and ask them any questions you might have. Some basic questions that I would ask include: Does it come with a warranty? How long is the warranty? Have there been any problems associated with the machine? How many capes can I flesh before the blade needs to be reground? How many revolutions per minute does the blade spin? What is the average time it takes to flesh a cape? How long does it take to change the blade? How often do I have to change the blade? What do I have to do to have a long lasting smooth running machine? The list goes on and on and one question leads to another.
If you have done a little research before you call you will probably have the answer to most of these questions all ready, if not the technical assistance people at the company should be able to answer those questions.
So now you know something about the fleshing machines that you are looking at buying, now you have to buy a machine. Don’t worry too much about the cost right now, they have a way of paying for themselves in no time. Buy the fleshing machine that you want that is capable of doing everything you want it to do. This is the second step and probably the most important step of all.
You have bought the fleshing machine, now you will begin to set it up at your designated work station inside your shop. This third step is also important even though this is where some of you are scared to death, assembly of a product that is going to help you save time and money. I suggest that you set it up right the first time and take the time to do so. If you just spend an extra half-hour or hour or day and set the machine up the way you want it, this will save you in the long run.
When I set up my machine, I remembered a couple of important notes, that I will add here. First allow for plenty of room. The more room you have the easier it will be to work with and the more comfortable you will be. Comfort is a key when it comes to running a fleshing machine, just ask the people at a tannery, if they aren’t comfortable they won’t last long. To flesh on a machine for 8 hours a day, 40 hours a week, I would have to be awfully comfortable.
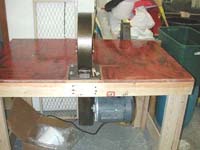
What exactly should you be looking for to make it comfortable you ask? Anything that you want, it is all a matter of personal preference now. I have heard of and seen many different methods of setting up a fleshing area. I myself am of the short-legged variety and most tables with a Dakota V fleshing machine on it are a little too tall, causing stiffness and soreness in my back. I designed my table for the Dakota fleshing machine to be built for my height (or lack there of), when I lean over the machine I am not on my toes, but I’m not bent over so far that it causes lower back pain. I can also pull a stool up to it and flesh from a sitting position, like I said, I like to be comfortable.
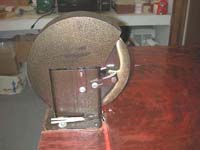
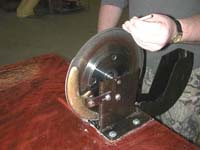
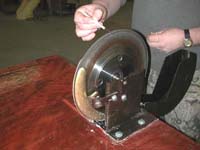
Dakota V Fleshing Machine
I also made the table big enough to accommodate most any hide, but yet not so big that I can’t get around it in the basement of my house. The size will vary greatly depending on how much room you have or don’t have. I believe my table is four foot by two foot, with the fleshing machine right in the middle, maybe a little offset to the right hand side since I work from left to right. Every person is a little different and I believe you will be happiest with your fleshing machine with these ideas in mind.
Every fleshing machine should come with instructions for set-up, and as we have all experienced, some instructions are good,and some not so good instruction.
The Dakota IV and V fleshing machines are really simple to install and put together. If you buy a Dakota fleshing machine from Van Dyke's, it will come with a motor and switch assembly, a 3/16" x 1" square key stock (this is taped to the motor), cap screws, flat washers, nuts, and the assembly (includes the blade, housing, arbors, guards, brackets, hood, and the belt). You will also receive a video tape showing you how to’s, and 1 pair of sharpening steels.
Most of the tools that you already have around the shop is all that is required. For the Dakotas a ratchet and 1/2" socket, 1/2" open end wrench, 7/16" open end wrench, 1/16" Allen wrench and 3/16" Allen wrench is all that is needed. You now have everything to assemble the fleshing machine, and bolt it to the table.
First things first, read the instructions, understand the instructions, start to assemble the fleshing machine.
Remove the square stock key and slide it into the groove in the motor shaft. Take the pulley from the box and slide it over the shaft and key stock. Be sure the set screw side of the pulley is facing the motor. It is very important to have proper belt alignment, or you will cause stress and torque on the blade which will in turn will cause wobble which in turn will cause chatter marks.
Adjust the pulley along the shaft so the outside of the pulley is flush with the end of the motor shaft. Tighten the setscrew down on the key stock. Next you will carefully remove the cardboard that is placed around the blade: be careful the blade is sharp. It will cut you at this time even though the fleshing machine is not running, the edge is just like any other knife’s edge and should be respected.
Now lay the fleshing machine on its side with the motor mount plate sticking up. Seat the belt in the top pulley, reach into the bottom of the housing and pull the belt downward. Insert the motor into the cut out at the bottom of the housing assembly and guide the belt onto the pulley. Insert the 5/16 capscrews through the slots in the motor and then through the hole in the motor mount plate, place a washer and a nut on the bolt to hold the motor in place while the other 3 bolts are inserted in the same manner. Have someone pull down on the motor to tighten the belt tension, then use the ½” socket and open end wrench to tighten the nuts securely. There, you now have the unit assembled and it is ready to mount to your table.
Once it is securely mounted to your table, you will adjust the guards. I believe that guard adjustment is all a matter of personal preference. As much as I hate to say this, you can do a lot with a fleshing machine, and a person's own comfort level with the machine will dictate the guard adjustments. The guards do not regulate depth of cut but are there for the protection of the user's hands.
I set my guards by loosening the ¼ “ cap screw that holds the guard bracket, only loosen enough that can move the bracket by hand. Then I loosen the two set screws that are on the bottom of the front portion of the guard bracket. These two set screws allow the guard to be moved closer or further from the blade and also allow for the guards to pivot. Again, only loosen enough to move by hand, but stay in the position you desire.
As I stand facing the fleshing machine, I like the guard on the right to be flush with the outside cutting edge of the blade. Once it is there, I tighten all the set screws and bolts on the right side. I then adjust the left hand guard so it is 1/16" to 1/8" distance from the blade. This will vary greatly upon your comfort level. I would recommend this setting for the first timers and those who aren’t real comfortable with the machine. I actually have my guard on my fleshing machine at home out a little bit further, if it’s on at all. Did I say on at all!!!!!
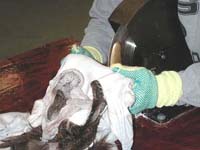
Yes, I said it, but I don’t recommend it and will not be held liable for it. I feel I have a little more control when shaving with the left guard off. I can see what I am doing and control the hide more. I always flesh with a pair of fleshing gloves on over a pair of latex gloves. This will not totally prevent cuts, but might save me enough to pay more attention to what I am doing. I only tell you this so you can have idea to what can be done with a fleshing machine.
If you are fleshing with out gloves and get hit by the wheel, it will not cut your finger off unless you leave it there long enough to. Trust me, when your finger hits the wheel, you won’t leave it there long enough to chop your finger off. Instead you will have a nice divot in you hand or finger, and it really hurts, especially when the salt or pickle bath gets into it. Like all wounds they will heal and cusswords will be blurted out, but you will be ok.
So you have your guard 1/16"- 1/8" inch from the blade, and at the same time you should adjust the guard to expose approximately 1/8" to 3/16" of the cutting lip from the 3:00 - 5:00 o’clock positions on the blade, now you can tighten all the setscrews and bolts. Please keep in mind the guards are mainly for safety and and have minimal control over depth of cut and you should fine tune the guards to fit your fleshing style.
Now for the most important step, the lip adjustment. Adjusting the cutting lip is a delicate operation that requires an extremely light touch. I listen for the right sound more than I feel for it. It is hard to describe, but once you hear the sound you will remember it and know your blade is ready. It is almost like a ringing zing that you will hear.
The higher you lift the lip up, the deeper you will make your cut. The closer the lip is to 90 degrees, the less deep cut you will make. I try to think that my blade is always at 91 degrees when shaving a deer cape, but to meausre that accurately is impossible, so I listen and watch the angle of my hand. I will also flesh on a spot that most likely will not make it onto the form or be seen after adjusting the lip.
I hold the sharpening steels in my fingertips with the pointed end steel in my left hand, and my right hand has the blunt ended one. There is no need for excessive pressure or force here, so insert the pointed steel into the corner of the blade and lift the lips up to no more than 5 degrees above the level of the floor. Lift only enough to make it ring. Now, with the other steel in your right hand, after you have lifted the lip with the left, roll the steel over the top of the blade and stop it when you are level with the floor. Never go more than 5 degrees past level with the floor when going this direction also. Listen for the zinging and you should be ready to flesh.
Now I prefer to flesh my hide after they have been in the pickle for at least a day. I find that they have a good swell and can be shaved very nicely at this time. Once I have shaved on the hide, I place it back in the pickle, and proceed with tanning. Before I mount, I thin once again in areas that I feel need to be thinned.
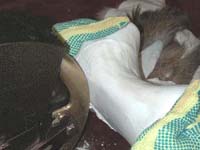
When shaving, I grip the hide with my thumbs on either side of where I want to flesh. My finger are gripping the hide and pinching it between my thumbs, pull it tight and swipe across the cutting lip. I have heard to make fast swipes, but I prefer to work at my own pace and will take fast swipes, slow swipes, and swipes in between. Do whatever you want as long as you are comfortable.
That is how I do it in the thick shoulder regions, basically from the face down. When I am doing fine facial work, or thin skinned animals, I really slow down and concentrate on what I am doing. One reason is, I don’t want to cut myself, and two, I don’t want to put any more holes in the cape, I hate sewing.
When it comes to the fine fleshing, I change my style and have the hide draped over my index finger of my right hand. My left hand is only helping to hold the hide in place. I then run the hide across the cutting lip with my finger behind it. I don’t set any speed record fleshing this way, but I don’t have to skife knife around these areas by hand anymore either.
As with all aspects of taxidermy, there is no wrong or right way to fleshing a cape or hide, it is all personal preference. Take the time to research the thought of buying a fleshing machine, buy the one you like best, set it up in a comfortable location. Get comfortable with the machine and watch the time you are now saving turn into something positive.
The Dakota V Fleshing Machine featured in Dan's article is available from Van Dyke's Taxidermy Supply. Click on their logo below to get there from here!
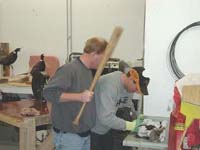
The antimateds were created with photos taken by Dan from the WHITETAIL DESIGNER SYSTEMS Bison Bull Taxidermy Reference Photo Series.