FORM ALTERATION
BY GLEN CONLEY OF WHITETAIL DESIGNER SYSTEMS
MOUNTING A DEER ON AN ALTERED FORM
One of the cool things about taxidermy is that it attracts all walks of life, all ages, and both sexes. It is one of those kind of things in which there is something there for every one. This diversity spawns a myriad of work styles, a myriad amount of material options, and a myriad of end results.
A beginner can be totally over whelmed and confused with all the options.
In writing this article, it is my desire to get you to thinking. I want to get you to using your own eye balls. I want to get you to using your own hands. And mostly, I want to get you to using your own brain! Remember, complexity is nothing but the sum total of simplicity.
I have to make some "TRUE CONFESSIONS" at this time. I have never seen a taxidermy video tape, I don't even own a TV. I did own one once, about thirty years ago. I have read three taxidermy books in my life. I have read only one copy of a taxidermy magazine. I have never sat in on a taxidermy seminar, but have helped to put a couple on. BUT I have mentally devoured the pages of taxidermy supply company catalogs. Taxidermy supply company catalogs are a treasure trove of information, not to mention the convenience of being able to buy desired materials and products from the very same pages!
There's a moral to the above "TRUE CONFESSIONS", if you think you can do it, go for it! You will not know what your limitations are until you have exceeded your limitations. So what, if you screw-up your first time? There's always a second, third, ad infinium, chance. Once you have completed your first effort, you will have a real good idea of what your weak points are. Study and work on those until they become your strong points. Never compete against the next guy, compete against your self.
With my prescription for learning and applying, many times a feller will do nothing more than re-invent the wheel, but at least he has a better idea of what makes it go round.
FORM ALTERATION
The form I chose for this "alteration to fit" was close from the stand point of needed measurements. The form, as it is, would fit up deer from the area in which the model or models came from.
The deer from my area are consistent in structure unto themselves, but inconsistent in structure compared to deer from other parts of the country.
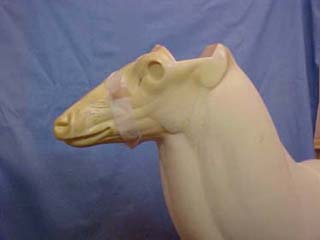
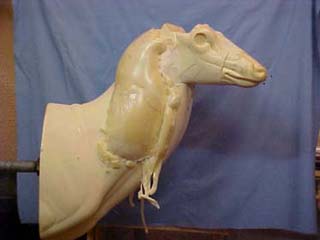
If this were the head and neck of a horse, and a horseman was viewing it, he would describe it as a "hammer head". The union of the back skull with the atlas vertebrae (1 st. cervical) create a sharp angle, yielding a look like that of a hammer head on it's handle.
A hammer headed animal will typically have a frame that would fit into a square when viewed from the side. This is due to each vertebrae being a fraction shorter than an animal who's frame silhouette would fit into a rectangle.
The "square" animal will typically have a shorter neck, shorter, more up-right shoulder blade, LONGER upper arm, and more of a barrel chest. The barrel chest creates a wider, flatter sternum, or brisket. What I just described are the physical parts that go into the makings of a shoulder mount form. But, let's finish out this "square" animal for a better understanding. The rib cage will be shorter in length. The length of hip from illium to ishium (illium being the point of the hip above and in front of the thigh, and ishium being the point near the butt ho) will be proportionately shorter. The thigh will be typically proportionately shorter, and the gaskin proportionately longer. This animal is a short distance sprinter by nature.
Now we'll do a quick superficial dissection of the "rectangular" animal. The lesser angle of the back skull does away with the hammer head look. Each vertebrae will be a fraction longer, resulting in a longer neck and a longer back. The length of the rib cage will be in keeping. The shoulder blade will be proportionately longer and "laid-back". The upper arm will most generally be shorter. Now, a big difference here, the chest will probably be more "compressed" vertically, yielding a more narrow sternum, BUT the heart girth measurement of the "rectangular" animal versus the "square" animal will probably be greater. The point of the shoulder (union of shoulder blade with the upper arm) will be more pronounced. There again I have covered portions of the front end that would be involved in a shoulder mount. I might also add the hip length will be longer, as well as the thigh being proportionately longer. This animal is built for the long run, literally, as well as taking jumps at speed. The grain belt land scape around here is cut up with fences every few hundred yards. Makes a feller wonder if we don't have some form of accelerated evolution and adaptation going on here.

RE-ATTACHING AMPUTATED NOSE
ALTERED NOSE TO EYE MEASUREMENT
CHANGE OUT HEAD PRINCIPLE
MANNIKIN ALTERATION 1
MANNIKIN ALTERATION 2
ALTERED DEER FORM
ALTERED MANNIKIN 1
ALTERED MANNIKIN 2
ALTERED HEAD
BUILDING UP NOSE
FINISHING NOSE PAD
FINISHED NOSE PAD
BIG BUCK, BIG MAN
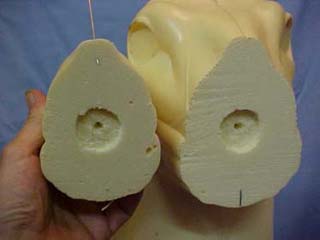
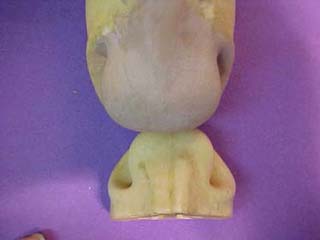
I prefer to re-attach the nose by making holes with a spade bit as illustrated.
I then fill one hole flush with body filler, and just very slightly over fill the other. I do that to help avoid carving from soft foam to hard body filler and vice versa.
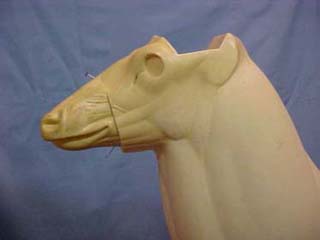
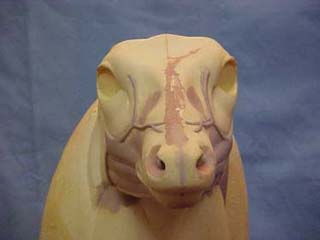
This form had the length of lip that was needed and the width of the back skull behind the orbital socket. The nose to eye measurement was too much, as was the over all length of the skull.
Taking out a section as illustrated cured both measurement discrepancies.
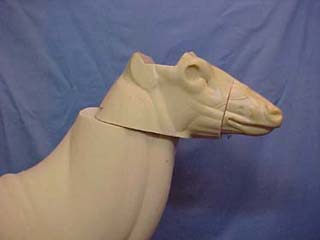
Here is the most critical point of this whole alteration, re-attaching the head in the proper position.
When I pull a cape on a form, I want to be able to simply pull the edges of the incision together and they stay there. With out altering this form, this cape would have "short sheeted" at the throat latch (neck-bottom jaw-Adam's apple union) and it would have been a real booger to close the incision.
The angle of the union at the back of the skull and atlas vertebrae on these "rectangle" animals is different because the proportions and shape of the skull are different!
The CRITICAL MEASUREMENT to take is FROM THE BOTTOM LIP to the ADAM'S APPLE. As you have already noticed, this does indeed change facial structure.
The head has been re-attached in the same manner as the nose was, except I just made bigger holes.
To the beginner, if you are using a change out head, cut off the existing head and re-attach the change out head with the above described techniques. YOU will have to determine what lines up with what.
I stapled on a plastic trash bag to make my "mold" for the two part foam available from taxidermy suppliers. Put those staples as close to each other as possible. Create a "pocket" with the plastic over the areas you want foamed. Leave enough area of plastic at the top un-stapled until you have poured your foam.
The foam comes as a two part liquid. Measure and mix, and IMMEDIATELY pour through the area at the top that was left un-stapled. Use a paper funnel like the kind you get at the gas station. It can be flattened out to fit underneath the plastic, and pitched once you've used it. Staple the remaining area as quick as the hands can fly!
You will be guesstimating the volume of foam to mix. I use lesser amounts of foam and will do two, three, or four pours. Just pull back enough plastic to get the paper funnel in, pour and staple again until the desired areas are covered. Do not remove the plastic until you are sure your areas are covered.
When you pull the plastic, you will have a greater or lesser mess than this. A coping saw and utility knife are used to trim off major excesses. A horse hoof rasp and block sander gets the project heading towards refinement. Two or three different sizes of round files are also most useful. Notice I have some what leveled out facial features.
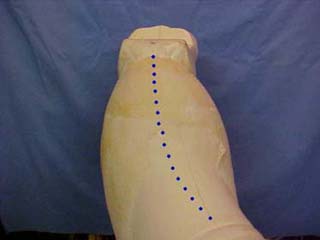
Using the blue dots as reference points, and the mold lines on the neck and head, you will see how I curved the neck. Notice the muscles on the right are at a state of flexion, while those on the left are at a state of relaxation. I've spent a lot of time on horse back, that can make a feller very much aware of neck positions. In fact, on an alteration such as this, I start my neck shaping from BEHIND the mannikin. Now, I did sand the edges of the muscles where they tie into the trapezius to make a smoother transition after this photo was taken.
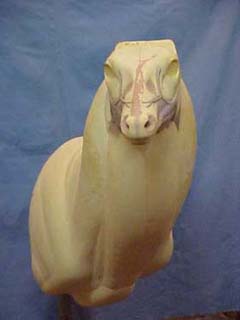
To get the facial muscle size, shape and placement, I use onion skin typing paper and make a tracing with a fine felt tip marking pen of the muscles of the actual skinned out head. I then take the scissors to the tracings and trace around them on a stiffer sheet of paper. Take these paper templates, pin them in place on the form and trace around them. You know have reference marks to sculpt off of. Use the contour gauge to help achieve side to side symmetry. The angular facial veins/arteries have been re-located also.
To get rid of the deep "V's" created in this manner, I use caulk on my finger tip and press it into the "V".
I failed to get a photo of the finished masseter (cheek) and ear butts, so, you'll just have to color that with imagination.
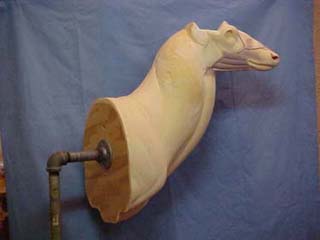
O.K., now that you have your mind and eye balls trained from your previous reading on "square" and "rectangle" animals, let's take a look at this brisket, arm pits, and upper arm. Again, this original form was in keeping with the "square" animal, correct for those, but incorrect for the "rectangular".
I did use the round files to increase the lay-back of the shoulder blade. This yields the illusion of a longer neck.
To have more accurately "nailed" this area, the angle of the shoulder blade and upper arm would have to be more open. The sternum would have to be a deeper "V" shape. The point of the sternum would have to be more narrow where the sternocephlacus muscles start up the neck, and that muscle narrowed at it's point of origin. Another plywood back board would have needed to be made to accomodate those changes, so, I had no trouble talking myself out of that much work!
I narrowed the eye corner to corner by carving. Using the contour gauge, I transfered the contours of the skinned head to the mannikin head. The top skull between the brows and brow muscle position were changed also.
This buck had a big bulb of a honker on him. The replacement nose, shown here for comparison, is about the same size as the original nose on the mannikin.
The nose was sculpted with Apoxie-Sculpt. This is one of the places that the contour gauge comes in real handy. It makes it so much easier to obtain side to side symmetry.
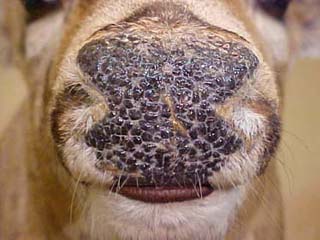
This photo shows evidence of the actual decomposition that had started to take place in the nose. When this photo was taken, I had already sealed the damaged areas of skin and the whole nose pad with Min-Wax natural wood stain. This was allowed to dry, and I have the first application of Mod Podge applied to the nodules and filled the cracks in some what. The Mod Podge was applied with an insulin syringe.
About the brown lower lip? I screwed up. I forgot to shape the clay after tucking the lips and didn't notice it until the next day. I'll use answering the phone as my excuse for getting side-tracked. The brown is Apoxie-Sculpt.
It took three Mod Podge applications to re-build the nodules and fill the crack voids.
This left the nodules too high, presenting that big goose pimply look. Puzzle-Pro was brushed on the whole nose pad. Puzzle-Pro is a jig-saw puzzle sealer available at craft stores. It is almost as thin as water, and does a pretty good job of self leveling. It will run off the high points of the Mod Podge into the lower crevices created, yielding a smoother transition from nodule to nodule. The nose and BROWN lip were painted with artist's oils. After drying, another coat of the Puzzle-Pro was applied over the nose pad.
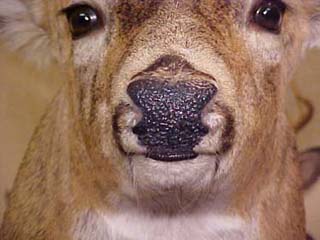
This isn't a real good nose, but it isn't a bad one either.
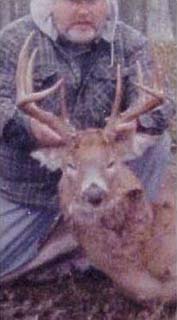
This is a photo of the buck used for these demonstrations. He weighed in at 210 pounds field dressed. How big you suppose that guy is that's holding him?
RE-ATTACHING AMPUTATED NOSE
ALTERED NOSE TO EYE MEASUREMENT
CHANGE OUT HEAD PRINCIPLE
MANNIKIN ALTERATION 1
MANNIKIN ALTERATION 2
ALTERED DEER FORM
ALTERED MANNIKIN 1
ALTERED MANNIKIN 2
ALTERED HEAD
BUILDING UP NOSE
FINISHING WHITETAIL DEER NOSE PAD
FINISHED NOSE PAD
BIG BUCK, BIG MAN
FINISHED SHOULDER MOUNT 1
FINISHED SHOULDER MOUNT 2
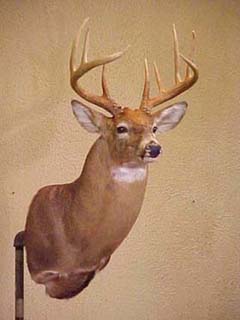
FINISHED SHOULDER MOUNT
One view of the finished whitetail deer shoulder mount on our altered form.
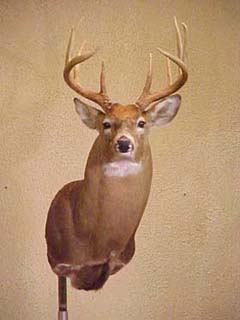
FINISHED DEER MOUNT
This photo wraps up our deer mounting on an altered form article.
You got eye balls, what ya think?