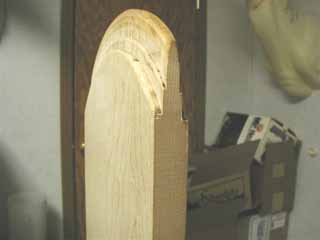
View of finished end.
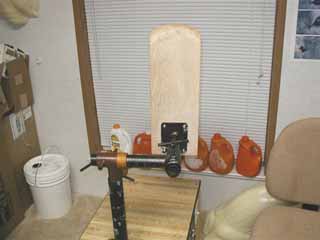
Breaking board attached to mounting stand.
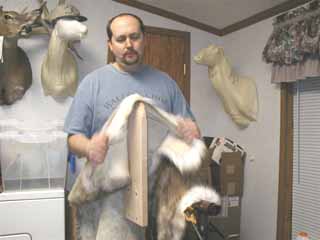
Breaking tool in use.
Paul Thompson
Thompson's Whitetail Taxidermy
Fort Gratiot, Michigan
Hide Tanning and Taxidermy is sponsored by
BREAKING HIDES AT HOME
by Michigan taxidermist
Paul Thompson
For the beginner, breaking a home tanned hide can be very hard depending on what information you found for directions on doing the job. Several methods have been applied and used over the years after the discovery of making leather soft. Some of them range from native Indians chewing on it, after doing something disgusting on it, twisting over a rope tied between two trees, beating it on a tree, drawing it over a dull axe head, working over the edge of a chair or table, and the list goes on.
Professional tanneries have developed large tumblers that use sawdust and gravity to break the leather soft as it dries. After tanning a hide, most leather will dry hard and stiff no matter what process you use for tanning. In addition, if you want your experiment to be soft enough to throw around the home, here is one method you can do to break that hide soft enough to where you want it.
I am not a professional tanner, but have done some research enough to tan at home, and by finding the use of a breaking tool that is not hard on the back and spine, to soften the leather with, I have achieved some soft skins and you can too. I did not invent this tool, but only reinvented it from a picture that I once saw.
Here is what I did, I tanned a deer, and caribou hide with a brush on synthetic tan. The tan producer also recommended an after tan softening oil applied 12 to 18 hours after applying the tan. And while drying, I followed the tanning directions and stretched the skin by hand, this is not hard, nor does it take very long to do.
After tanning a doe hide, I thought about purchasing the breaking tool, but doing things backwards most times, I had the hide tanned and ready for breaking, and no breaking tool on hand. So while looking around, and standing around brain storming I came up with the idea to make my own tool.
Remembering the picture I saw, I found a piece of 3/4” hardwood maple that was about 16 inches long, 8 inches wide, and I traced a radius on the end using a paper plate edge as a template. I then cut the radius with a band saw.
I took a hand router and with a convex bit, routed the edge as deep as I could as so to leave a 1/8 th inch edge after routing both sides. I then changed the bit to a flat edge-cutting bit and recessed the edges of my first cut, twice, raising the depth on the router guide each time to remove the material that would eliminate drag of the hide, yet leaving strength in the tools working end. This step I guided the router by hand as I had no edge to work with.
I then clamped the board to the mounting bracket of my taxidermy mounting stand, and drilled four ¼” holes in the wood. I used carriage bolts to bolt the tool to the mounting stand and went to work. Although not everybody will have a taxidermy mounting stand to fasten the breaking board to as I did, you can mount the tool on a post out in the yard if you wish. Another idea is to weld a heavy walled pipe to the center of an old tire rim and use it for the stand. You will need “U” bolts to attach the tool to the pipe. You may have to think on you’re feet to invent your own tool holder. Then all you need to do is add the hard work and get to breaking of the hide.
Tips on wood, pine is too soft, oak is too brittle. Maple, Ash, Poplar would be better choices if you had the wood on hand.