There are many ways to mold and cast fish heads. While this method will work for any size head, it works extra well on large fresh, and some saltwater fish, namely stripers, catfish, salmon, red fish, large trout, etc. If the mold is handled with some care, multiple castings can be made.
Materials needed:
Alginate( powdered)- Mid ranged priced brand will work fine. Approximately 5 lb. to do a large head and have extra as a back- up
threaded rod
Plywood
Hot Glue
Super Glue
Sheet metal flashing
High fiber
Auto body filler and hardener
Polyester Laminating Resin
MEK Hardener( comes with resin)
Fiberglass Strands( optional)
5 lb. two part urethane foam
5 gallon mixing containers( or larger)
Quart size mixing containers
Strong mixing sticks
Crow- Bar
Medium bristle brushes
Blow Dryer
Paper towels
Lots of cold well water
Small Chunks of foam and small wood mixing sticks
Safety goggles, latex and rubber gloves, protective clothing and a well ventilated area to work in.
-HEAD PREPARATION-
We will start with the fish laying on your bench with the head still attached. We need to remove the head from the skin, but leave some of the carcass with the head for molding. Start by cutting the skin at the throat latch with your shears and move up around and cut the skin on the "skin side" of the collar bone (see picture). This bone should stay with the head. It is important for molding.
Continue cutting up and around the top of the head. Your cut should be at the line the scales stop and the head begins. Do not cut to deeply into the meat, just the skin. Cut the skin at the throat latch as close to the fish head as possible. Be careful not to cut the bone and the meat that connects the throat latch to the head. Your cut should be a compete circle around the head. Skin your fish out as normal, but leave the carcass attached to the head and leave as much meat as possible with the carcass near the head. Once your fish is skinned, cut the carcass off an inch from the tip of the gill cover. This will leave the collar bone and the meat at the top of the head, as well as the meat and bones that make up the throat latch. Spray head off completely with low pressure water spray. Set vertically in sink so water drains off. It is ready for molding.
You must now set the head up for molding. We want to set the head up vertically, in other words, head up facing the ceiling if positioned on work bench. When looking down on the piece, you will be able to see the complete mouth detail.
Start by cutting a piece of plywood that's at least 8" bigger than the head with gills flared. Cut two smaller pieces. Position these smaller pieces on the larger piece of plywood so they are equally spaced and near the center of piece. Screw down firmly. These two smaller pieces are there as extra support for your threaded rods, which will hold the head up and stabilize the head for molding. The next step is to determine the length of threaded rod needed. You will need two pieces, one for stabilizing the throat latch area and one for stabilizing the brain cavity area. The length you need depends upon the size of fish being molded. They should only be long enough to hold the head upright. The carcass piece still attached to your head should rest against plywood evenly.
Measure out the distance between the throat latch and brain cavity, and with this measurement drill two holes into the smaller pieces of plywood you attached to the larger piece of wood. Do NOT drill all the way through both pieces, just through the smaller piece and a small way into the larger. Hot glue the threaded rod into these holes. We do not want to permanently set these rods in, just enough to hold it in place for now.
- Positioning Head on Rods-
It's time to position the head on the threaded rods. Make sure all slime and debris are removed. Lower head down onto rods and seat firmly. Again, the bottom of carcass left on head should rest evenly on board. Open mouth to desired position. Put a few chunks of foam into mouth to fill void area. Flare gill covers to desired opening. We put a piece of cardboard ( cereal box type) under each gill cover to flare it. If you keep it close to the size of the gill cover, it can be kept on during the molding process. We use upholstery type pins to flare the gill covers. We run these pins through the cover and into the meat. This should hold them firmly in the desired position. Take your blow dryer and dry the head off. Put in freezer and let freeze for at least 3 hours, or until it sets up.
-Molding the Head-
Take head out of freezer. Blow dry off again to remove ice crystals and any remaining water. Pull any pins you used for setting the mouth or gill covers.
Now we must mix up the high fiber. Take a mixing container and fill it about half full of water. Add the high fiber powder slowly to the water , mixing as you go. It should have a creamy consistency when mixed. It should not be too watery, as it has to hold it's shape for what we're doing. Neatly fill in the mouth area with the fiber, as well as the inner gill area( under gill covers) . There should be no under cuts. Look over entire head and make sure there aren't any areas that would make for a hard removal of head and the casts. Fill these areas in with high fiber.
Cut a piece of Metal Flashing that's at least 1" taller than tip off jaw. It should be long enough that it can completely circle head. There is no need to have a lot of void area around head, as you will be wasting alginate, just enough so there's a good "cone " around it. We hot glue the seam on the flashing, and then put a few dabs of glue around the base of the flashing, where it meets the plywood. This will hold your flashing in place. Build up a "dam" of high fiber around base of head, so the alginate does not leak under it. Have extra high fiber ready in case of a "leak" .
Time to mix the alginate. Use very cold water. Fill two or three one gallon mixing containers half full of the cold water. Start by adding the alginate powder to one of the mixing containers. Mix in evenly until it is at the consistency of pancake batter. Move FAST, as alginate sets quickly. Start by pouring off the head and work it over the rest evenly. Holding the container high above the piece and pouring it onto the head in a smaller stream will help to reduce air bubbles. You probably will not have enough alginate with the first container to completely cover the head, so quickly mix the second and third( if needed) and pour over head until completely covered. It should cover the head at least 1" above the tip of the jaw. Tap the sides of the metal flashing to remove air bubbles, but be careful to not dislodge your bond at the base of the flashing. Watch for "leaks" of alginate at the base and clog up with high fiber.
- Demolding Head-
Let the alginate set up for at least 1/2 hour, as the alginate close to the frozen head is colder and takes longer to set up.
Start by removing the flashing from around the "cone " of alginate. Set aside for later. If you molded a large head, take a crow- bar and carefully break the seal at the bottom of the head. Turn the head and alginate mold upside down and slowly and carefully demold the head from the alginate. Take your time and avoid tearing the mold. Once head is demolded, carefully clean away all high fiber, blood, etc.. Mold can be washed with cool water to aid in this cleaning.
-Casting Fish Head-
Dry mold out with blow dryer and paper towels. Tape the flashing back around the alginate mold in the same position it was originally in.
We like to do our large head casting outside whenever possible. If it must be done inside, use an exhaust fan and respiratory protection. Use latex gloves and eye protection. Use rubber gloves when handling the MEK hardener.
Take your smaller mixing container and fill it a 1/4 full of auto body filler. Mix polyester laminating resin into it until it is at the consistency of pancake batter. Mix in a fairly liberal amount of auto body filler hardener and a few drops of MEK.
! MEK is a dangerous chemical! Always wear rubber gloves and eye protection. It is very Flammable. One drop in you eye can cause blindness!!!
Slowly pour your mixture into the inside of your alginate mold. Drizzle it over the edges and down the sides. Use your brush to paint the mix up off the bottom and over the sides until it sets. By doing this, you're pressing the mixture into the detail, as well as removing air bubbles. Because these molds are fairly large, we do not recommend swirling the mix in the mold, or slurry casting as it's called. Repeat this process a couple more times to give the cast strength. You can add chopped fiberglass to add strength if you would like. After the auto body filler mix has set, mix up a small amount of two part urethane foam and pour it into the casting while it's still in the alginate mold. The auto body filler mix will act as a barrier so the urethane will not be affected by the wet alginate. If needed, mix up more foam until it fills the cavity.
-Demolding The Cast-
Demolding is fairly easy, simply work the cast head out of the alginate. If you are careful not to damage the mold, the above process can be completed a number of times until the mold finally rips.
Some heads will demold faster and easier than others.
-Finishing the Head-
Grind out mouth area and eye sockets. Grind away flashing around gill covers .
Check over entire head for weak areas.
To finish mouth, use five minute epoxie to coat interior of foam. You can add a mouth insert, a tongue, or sculpt the detail back in with apoxie sculpt.
Please feel free to contact us with any Questions.
Follow all safety procedures and recommendations on all chemicals.
Good molding and casting!
Aaron N. Stehling
Molding and Casting Dept.
Greg Stehling & Son's Fish Taxidermy Studio
Greg Stehling & Son's Wholesale Fish Taxidermy
Presents
Molding & Casting Large Fish Heads
by Aaron N. Stehling
Molding & Casting Dept.
N4027 Hwy N
Jefferson, Wisconsin 53549
Ph. 1-920-674-3724
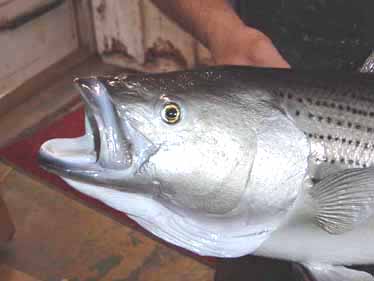
Cast and finished striper head by the crew at
Greg Stehling & Son's Fish Taxidermy Studio.
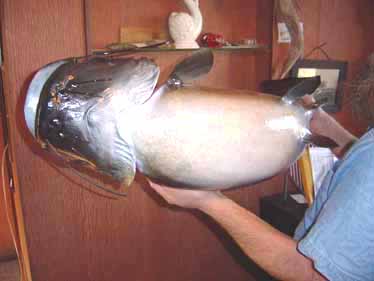
Flathead catfish with molded and cast head done at Greg Stehling & Son's Fish Taxidermy Studio.
For more fish taxidermy techniques by Aaron Stehling see Molding & Casting Large Fish Heads Part II - Mouth Detail