I can't recall the number of times I have seen Taxidermy Net Forum post asking about eyes. Where to buy them, what color to order and how to measure for proper fit. Sometimes it is difficult for me to respond, since I normally make all the eyes I use for my detailed taxidermy work. Whenever I do mention making them, a flurry of emails requesting details or procedures results. Since time does not allow a full reply to most inquirers, here are the procedures employed, once and for all, to provide the basics for the beginner and advanced taxidermist alike.
How many times have you broken a single eye and had no replacement? What happens when an eye pair is backordered and there is little time to seek another source? Do you sometimes need eyes that are in between standard sizes, or larger or smaller than that available? Well, thanks in part to modern materials, the proper eye can be made in short order in the shop. Here's how:
Materials needed:
Two component RTV silicone putty from Alumalite
(Available at Stutesman Taxidermy Supply)
Clear casting resin. Clear Cast brand is preferred, but not necessary.
A set of round jeweler's burrs or dental burrs as illustrated.
A small rotary sanding drum for a Dremel or Foredom tool
Liquatex "Glossies" brand black acrylic paint
W/B acrylic paint in various colors
W/B Silver and Gold metallic paint
Pearlescent paint or dry pigment
Container for material (see text)
Marble or other model shape
400 grit sandpaper
Epo-Grip "Ultra Clear Coat" or equivilent gloss epoxy or clear gloss lacquer
Making the Mold:
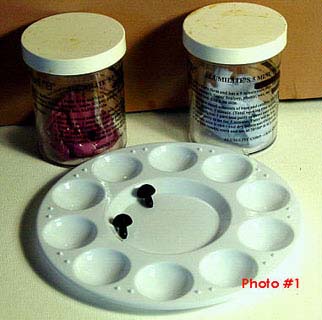
A simple eye mold may well be the easiest chore you will ever perform in the shop. It is nothing more than a hemispheric depression into which clear material is to be poured. The kneadable, two component RTV compound sold by Stutesman Taxidermy Supply has been around the jewelry industry for a long time. Dentists too employ a similar impression material. It is an excellent form molding or impression material. To use the putty, simply prepare a small ball of each the "A" and the "B" side and knead together quickly to form a mass that is of even color with no streaks. Work quickly with the material, since it has around a five minute pot life after mixing and like time, it waits for no man. The kneaded material is pressed into a container. I use the forty-nine cent watercolor palettes sold at Walmart for the purpose. (Photo # 1)
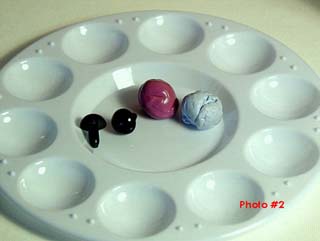
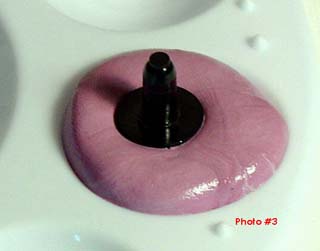
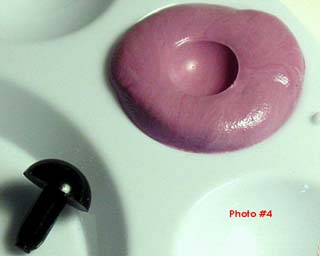
After the material is placed in a container, a model shape, such as a marble or in the illustrated example, a novelty eye on a plastic post, is pushed into the material to a depth of 2-3 millimeters or more, depending on the intended use of the eye. Remember that the only portion of the eye to be replicated in the cast is that portion of the eye from the upper (frontal) surface of the iris to the outer or corneal surface of the eye. Remember that the casting is a convex shape and the thicker it is poured, the larger the actual color spot that will represent the pupil will appear when seen from the front of the cast eye. I will cover large mammal eyes and compound (multiple component) and aspheric eyes in additions to this text at a later date. (Photos # 2-3-4).
Casting and Finishing
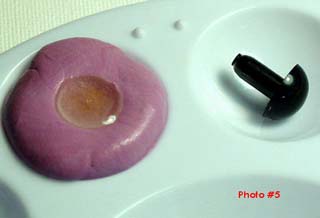
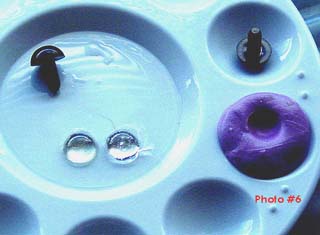
When the mold rubber has fully cured (an hour at most) it may be cast with no release agent. Casting is done with the Clear Cast Acrylic, Epo-Grip's "Ultra Clear", or Industrial Polymer's "CrystalCast". (The eyes in the photographs were cast with the Epo-Grip product.) Mix the material by the manufacturer's directions and pour into the mold. After the casting has cured, remove it from the mold (Photos #5-6) and sand down the back of the eye with fine sand paper to smooth the surface.
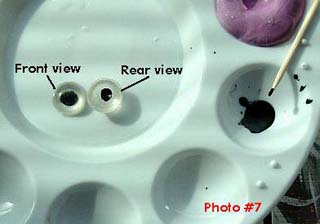
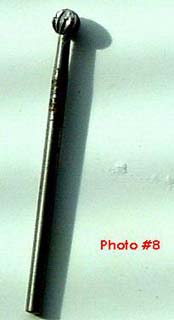
Use the mini-drum sander or a file to dress the edges and make them the proper shape for the orbital socket in which they will be placed. (Allow at least 12 hours for acrylic resins and from 20 minutes to one hour for co-polymers.) Mill a "pupil" in the rear (flat) side of the casting. Remember that the pupil made will be magnified a bit when viewed from the obverse side, and must be made smaller than the size desired. Photo #7 shows the castings with the pupils milled and filled with the glossy black paint (Photo #8 shows the proper bit for milling the pocket.) If wires are desired they may be inserted in the milled cavities and the cavity filled with epoxy resin to which black pigment has been added to anchor them.