FISH TAXIDERMY HOW-TO
This web site, Hide Tanning and Taxidermy, is sponsored by:
Cur's Ten Steps to Casting Better Fish Heads
by Bill Gaither (CUR)
Some of the most frequently asked questions that arrive by e-mail here at the studio deal with the casting of fish and fish parts. Some are very simple and some quite complex. Most deal largely with how to cast the mouth details as well as the outside form of common fishes.
While many mold materials may be used to construct a fish head mold, temporary molds are always the better way to begin, since no casting made from a life mold is perfect in all details. That conclusion having been drawn, I prefer to make waste molds from alginate material and then chase or correct the casting before spending the time and money to build a Silicone RTV mold for production purposes. The preliminary casting may be chased and corrected to perfection prior to molding in RTV for multiple casting purposes.
Over the past forty years, I have streamlined the materials, tools and processes, until I have arrived at a technique which allows me to cast the interior and exterior detail in a single mold, made by what I think is a simple method.
Here is that method, beginning with the tools required for the job at hand: The first skill one begins to acquire when casting an object is difficult for our human eyes and vision center to develop. That is the ability to think in the reverse, or in negative space terms. That is to look at a three dimensional object and convert the shape into a space on the inside of a mold.
This ability to perceive form in reverse is necessary for the planning of complex molds, in order to arrange the parting lines and sections for the most optimum mold function and to insure release of air from cast parts, while insuring delivery of the casting material to all parts of the cavity.
Fortunately, most fish heads are very simple forms that can be interpreted by the novice. Some species having spiny or turmerous projections on the head and opercular regions may require special treatment, but most common species may be cast by this method.
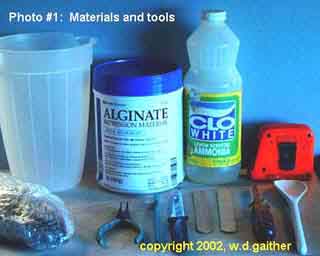
TOOL LIST:
Scapel Handel with straight, drop point blade....(I like the Bard-Parker handles sold by Rio Grande Supply and the ribbed-backed Bard-parker blades for this purpose.)
Alginate........The Douglas and Sturgess, 45 minute cure product is best for ultimate detail. Store the alginate in a refrigerator prior to use to chill the powder to allow for longer work time.
Bent-nosed, model-maker's pliers...........Used to break off dog teeth and other mandibular teeth prior to molding.
Tape measure or steel rule.
Wide bladed screwdriver or 1/2" dowel stock........For attaching a "handle to the head".
Mixing bowls............Three quart capacity for alginate and smaller container for resin, Rubbermaid or Tupperware type.
Cylindrical mold container.......I prefer cheap ice tea or other beverage pitchers. No matter what object is used, it must have straight sides for easy release of the encapsulated head. One liter soda bottles may be cut off at the shoulder for the purpose.
Cross sticks or wire......... for suspension of the handle. I drill a 3/16 hole through the dowel and use a number ten wire to suspend the head in the container. Two cross sticks will support a screwdriver handle.
Serrated Knife.......Or side cutters or snips for severing the head.
Spatulas.........For mixing the alginate, and the resins.
Bowl of ice water.........To use when mixing alginate to slow reaction times.
Ammonia.............To clean and de-slime the fish head prior to casting.
Toothbrush...........To assist cleaning the interior of the mouth and rear of head.
Small scraps of styrofoam...... For blocking the head into position prior to freezing.
Toothpicks..........Or soda straws for bracing the mouth, larger props for large fish.
Jeweler's saw or coping saw.........For cutting the vent and sprue surplus from the casting.
Separating, preparing, molding and casting a fish head:
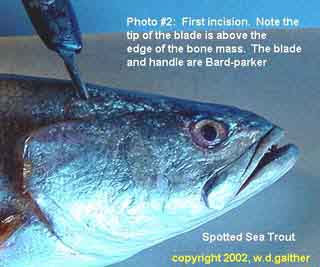
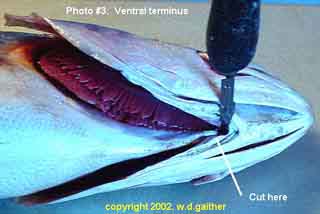
1.) The head may be separated by several methods. I prefer beginning a cut at the anterior end of the skull as illustrated in
Photo #2 and then continuing along the front edge of the gill
brach membranes to the ventral side of the fish at the juncture
of the opercular groups.
Photo #3 This is done on both left and right side of the head, using the scapel.
After the head is separated, clean it with ammonia by using the toothbrush inside the mouth and to reach into recessed areas. Clean well and then rinse in clean tap water, allow to drain for a bit before continuing.
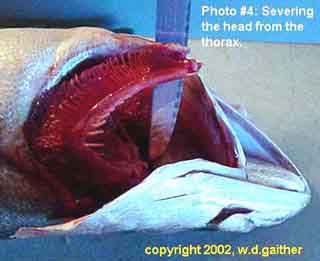
2.) Leave the gills attached to the thorax until after the head has been severed at the atlas vertebrae, using the serrated knife, or a pair of clippers or coping saw.
Photo #4 3.) If the gills are to be cast, they may be removed at this point by cutting through the rear membrane adjacent to the scapular girdle and removed as an intact group. (Not illustrated)
The gills may be carded with Darico's "Foamies" and blocked and frozen in position for molding at a later time. The cast gills may be fitted to the head cavity by milling with a dremel tool until they fit in a natural arrangement. when the fitting is complete, they may be glued into place with thixo epoxie, such as Epo-Grip's Thixo adhesive paste.
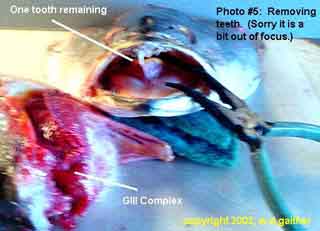
4.) Using the bent-nosed pliers, break off the exposed teeth. A cut-off wheel on a foredom or dremel tool may be used for large teeth. Cut or break off the teeth just above the gum line. The stumps will remain evident in the casting and will provide attachment points later for artificially made teeth.
Click here for more fish taxidermy head casting.
WHITETAIL DESIGNER SYSTEMS, INC.
Has made another expansion! Web site services for taxidermists are now available!