Continuation of
FISH TAXIDERMY HOW-TO
Casting Better Fish Heads by Bill Gaither
Photo #6 Attach the dowel or screwdriver handle.
5.) There are two principles to follow when casting any object:
The first principle common to all casting is the establishment of a delivery system or tract through which the casting compounds may be introduced into the mold cavity. These ducts or ports are called, "Sprues".
The second principle dictate deals with releasing the air contained in the mold. As the casting material enters the mold, the air must be allowed an escape path. The escape ducts or ports are called, "Vents".
Any mold, no matter how simple or complex, must contain one or more material delivery sprues and one or more vents to allow the escape of air or gases.
When devising this method of casting fish heads, I took a tip from the ancient Chinese and designed the process so that a portion of the casting, itself, (the operculae) became the vents that allowed for the release of air as the casting material was poured.
6.) The sprue for the fish head casting is the screwdriver's shank in this case, or a dowel which may be inserted into the brain cavity after drilling a bore hole in the back of the skull to fit the dowel's diameter.
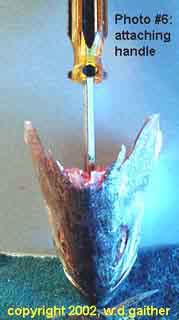
(Photo #6)
During molding, the cavity left by the dowel or the screwdriver becomes the mold's sprue hole through which resin is poured to form the casting.
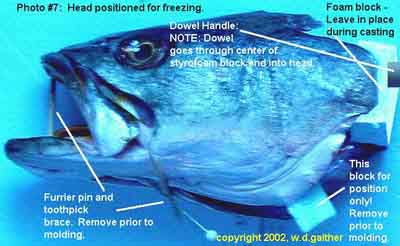
The styrofoam block pinned between the operculae provides a collection reservoir for excess resin and allows the operculae to function as vents through which air escapes and the resin rises to form the thin parts. The styrofoam block should extend a bit past the tips of the operculae to allow a measure for the pour. After pouring the alginate (see below) the foam block and the dowel or screwdriver is removed prior to removing the gelled alginate from the surrounding container.
7.) Block the head into position by using a toothpick or straw section to expand the mouth. (The use of a toothpick or plastic straw allows for the brace to be snipped in two for easy removal after freezing the head.)
Photo # 7
When the fish head is blocked to your satisfaction, place it on a styrofoam plank and then freeze it, uncovered, until hard. When frozen hard, retreive the head and use snips or shears to cut the toothpick braces from the mouth and remove them. LEAVE THE STYROFOAM block between the operculae and the dowel handle or screwdriver, as well.
Place the fishhead into the molding form (Pitcher, soda bottle, etc.) nose-down and suspend with a sturdy wire inserted through a hole drilled into the dowel at the proper height, or by bracing the screwdriver handle between two square sticks set at the proper height.
Make sure that a minimum of 3/4 inch is left between the nose and the bottom of the container. Use a magic marker to mark the dorsal (top) side of the head in position by making a line on the outside of the container.
Illustration, Photo #10
8.) Since the object of this exercise is to cast both the inside and the outside of the fish head as an integral unit, the mold needs to be formed in two parts.
Alginate, by nature, does not stick to itself, allowing for well fitting mold seams. That property will be used to advantage in this technique.
Most fish heads are shaped as cones or truncated cones by design and form. The shape itself, allows for easy removal of the head from the mold - EXCEPT that the narrowing of the rear of the mouth at the gullet forms an hourglass shape that prevents removal of the head following gelling of the mold material. To preclude this, the mold is poured in two stages, the first to shape the front of the head and the interior of the mouth, the second to form the rear of the head from the gullet narrowing to the tips of the operculae.
9.) After positioning the fish head into the molding container, mix an amount of alginate to cover the fish head to a point just beyond the terminus of the upper mandible, or one half inch beyond the eye, whichever is the greater depth. Mix the alginate well with the ice water and pour around the suspended head. Allow the first pour to set.
Kill the setting time by cleaning out the container to ready it for the second stage pour.
Use a small scoop or blade to dish out three small half-round keys into the gelled alginate surrounding the head.
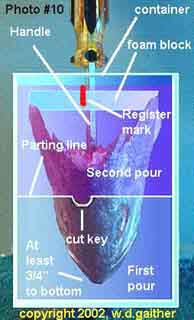
Photo #10
The shapes will enable you to re-fit the two halves together later.
When the keys have been cut, mix and pour the second alginate batch to a point which just covers the styrofoam block between the operculae, or the tips of the operculae if the block is long enough to extend beyond the pour.
When the second pour has gelled, cut a small notch into the edge of the alginate to mark the point where the magic marker line is located on the outside of the container.
Remove the styrofoam block from between the operculae and the dowel or screwdriver handle. The head will remain in suspension at this point.
Stick a fillet knife blade or other thin shim down the inside of the container to allow air to reach to the bottom of the pour. If the container is a waste object, such as a soda bottle, simply cut or drill a hole in the bottom for this purpose.
Invert the container and dump the alginate mass onto a clean, wet surface.
Gently pry the first half pour from the nose of the fish, exposing the front half of the head. Using the scapel, make a cut, through the alginate only, from the center of the top of the head to the top of the alginate mass.
Gently open the alginate like a purse and peel it away from the contained fish head. You may make a few small relief cuts if need by, but it isn't necessary to do that for most game fish species.
When the fishhead is removed, fit the two halves of the alginate together, using the keys to register them.
When the seams are flush, and the registration exact, replace the alginate into the container, aligning the notch with the magic marker line. (The reason for doing this is that some containers have fluted or specific bottoms or are irregular enough to force this precision alignment.
10.) When the alginate is in place, mix a quantity of fiberglas resin with an amount of bondo, or other body filler. For most castings, a mix of 25% bondo to 75% resin is sufficient. Large fish, having thicker heads may require a greater amount of filler.
Normally, thicker heads require less catalyist than do thinner heads, and the mix may remain the same percentage for detail purposes, by reducing the amount of catalyst used.
Mix the resin and body filler well until uniform and then add a sufficient amount of red creme hardener for body fillers to cause the mixture to become a gray/pink color. Too much may cause cracking in large molds, too little will cause either a slow cure, or failure to cure. There is no magic bullet for this part of the process. When in doubt, mix a few small batches until you feel the color and performance is controlable and proceed from there.
When the resin has cured, peel off the alginate and then use cold water and a scrubbing with the tooth brush to remove all alginate from the casting. (Any alginate missed will turn white after drying and can be easily seen for removal purposes.)
If all has been done well, the resulting casting will be accurate and have all oral cavity and exterior details. There will probably be some "flashing" around the head where the two mold haves joined and the same on the inside of the mouth cavity. Usually the flashing is very thin and requires a minimum of effort for removal.

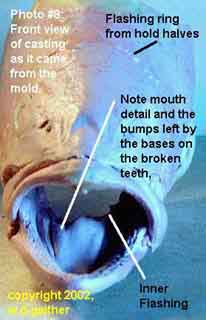
Use a jeweler's or coping saw to cut the excess resin left between the opercular flaps and to remove the sprue formed in the cavity left by the dowel or the screwdriver.
Small air holes may occur if you can't vacuum the resin prior to pouring, or there may be small beads on the surface left by resin filling air holes on the inside of the mold. In either event, they are easy to remove or fill and cleanup of the casting shouldn't take more than a few minutes.
NOTE: The entire molding and casting procedure usually involves less than thirty minutes of time when using Dental Alginate and around two hours when using the Douglas and Sturgess product, due to the longer setting time of the D & S alginate.
That time allowance discounts the freezing time for the positioned head, which may range from as few as twenty minutes for a bluegill to a day or more for a tuna or marlin. (Large fish head molds are made by a different process......This procedure will work for most freshwater fish and many saltwater species.)
TEETH: Epo-Grip and others make some thixo compounds designed to build up teeth to replace those missing in the casting.
Large "canine" teeth, such as those in muskie and barracuda and the like may be formed from toothpicks or other shapes and then coated with epoxie.
Shark teeth may be made from shapes cut from briston paper and coated with epoxie. In any event, the small bumps in the jaws left by the broken tooth bases will allow for correct and proper placement of the ersatz teeth.
Good luck and good casting!
Bill Gaither (Cur)
WHITETAIL DESIGNER SYSTEMS, INC.
Has made another expansion! Web site services for taxidermists are now available!